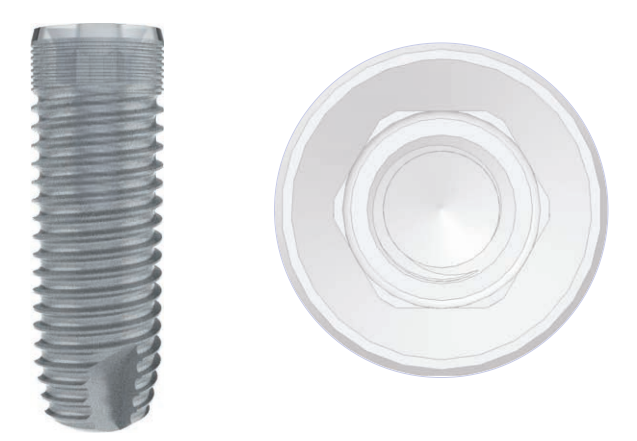
The implants of the RatioPlant® Classic line are cylindrical screw implants with sandblasted and etched surface for all indications.
The implants show an interior hexagon, a conical edge and an internal thread to US standard.
Made of Ti6Al4V - ISO 5832-3
The Classic line features over an atraumatic cutting thread with three cutting slots to the bone chip admission and rotation protection.
For an ideal indication with consideration of stability the RatioPlant® Classic implants are available with two diff erent platforms - Standard and Large.
Advantages
Easy insertion by double thread guidance at the implant external thread.
Outstanding a healing with optimum apposition of the osteoblasts to the special nano-surface
Familiar handling by the popular hexagonal structure of the connection implant/abutment.
By the conical transition from the upper edge to the hexagonal the RatioPlant® implants achieves a high sealing between implant and abutment also under load.
Anatomical root analog design for excellent cosmetic results.
Possible platform switch at the transition between implant and abutment
Simple colour system
RatioPlant® Classic Implants and drills are marked depending the diameter
with the colours red, green, blue und white. This will simplify the surgical process already in preparation of the surgery and off ers additional safety during
the surgery.
Platforms
RatioPlant® Classic Implants are available in four diameters and fi ve lenghts.
All implantsizes are distributed on two platforms:
Standard - implant diameter 3.8 and 4.2 - all lengths.
Large - implant diameter 5.0 and 6.0 - all lengths excluding 6.0/16.0.
Hereby the range of healing caps, tools as well as the prosthetic components
is reduced to a minimum.
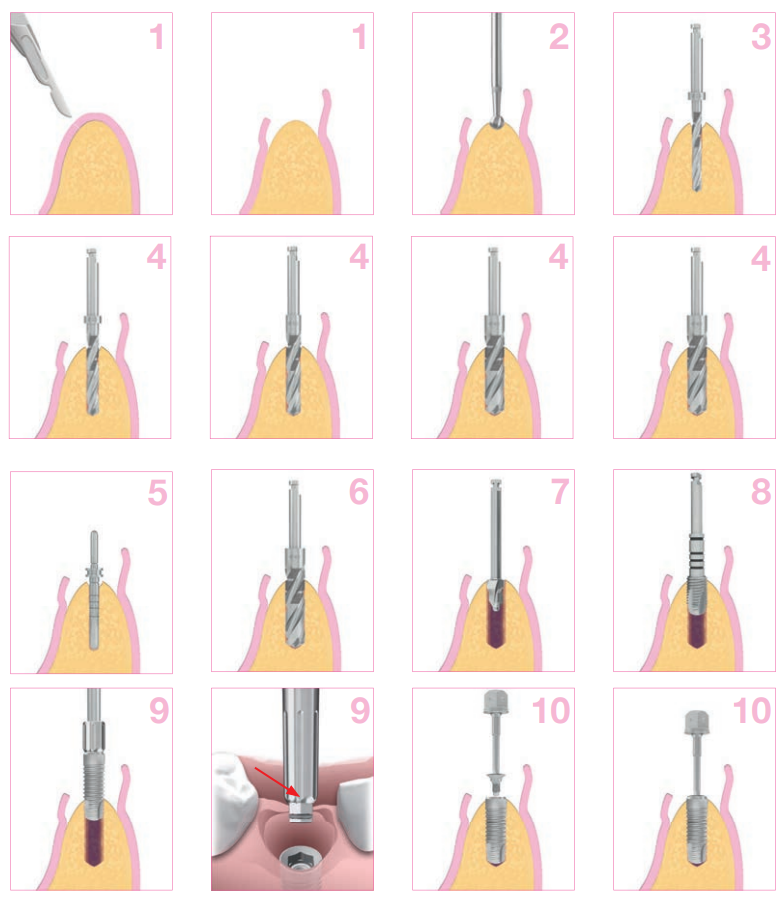
Surgical steps – example
Surgical Phase – using the example of RatioPlant® Classic 4.2 / 11.5
1. Exposure of the bone using Scalpel or Gingiva cutter
2. Punch-marking - defi ne implant position
3. Pilot drilling
4. Extension drilling to necessary diameter
5. Depth measurment (optional ∅ 2.2 - 5.3)
6. Final drilling
7. Countersink
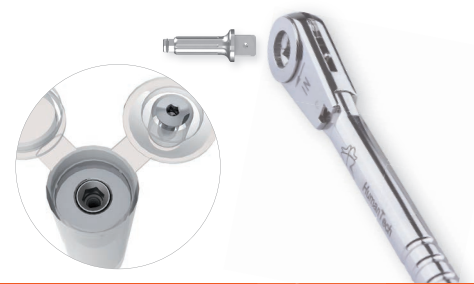
8. Setting of the Implantat using adapter for motor, subsequently tighten using torque ratchet and adapter for ratchet with max. 40 Ncm Pay attention to final position: Hexagon edge in buccal direction!
9. Attach the coverscrew
Healing phase
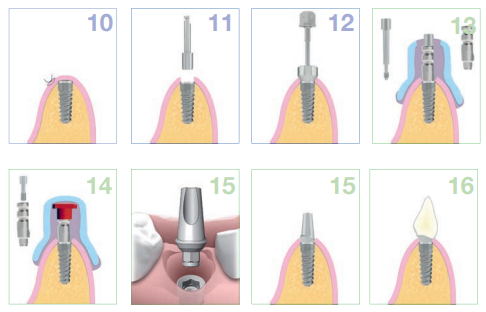
10. Obturation
11. After haeling phase (4-6 months) Exposure using Scalpel or Gingiva cutter
12. Use of the healing caps
Prosthetic treatment
13. Impression post (open tray)
14. Impression post (closed tray)
15. Setting of the Abutment (Fixation of new Prosthetic Screw with max. 25 Ncm by using torque ratchet. Repeat after 5 minutes absolutely necessary!)
16. Incorporation of dentures (crown)
Advice
The following descriptions are not suffi cient for the immediate application of
the RatioPlant® Implant System. We recommend the briefi ng into the handling
of the RatioPlant® Implant System by an experienced surgeon. Fundamentally
the RatioPlant® Implant System only should be used by trained dentists,
implantologists and dental technicians.
Methodological errors can lead to the loss and damage to the peri-implant
bone. Processing and application of the products are beyond our control and
are under the responsibility of each user. Any liability for damage which caused
in this case is excluded.